
Why do you need tags for Contacts?
Often, you work with a project-based structure or need to distinguish and organize customers within your dashboard and API. You may also want to filter and structure them in a flexible way.
For this purpose, tags are a very useful feature. You can assign tags to contacts (as well as DNS zones and domains, see other articles) to better organize your data and structure.
Tags are also available via the API and can help you organize and automate your domain reselling business, as well as support internal documentation and workflows.
Please note that you cannot change the type of a tag once it has been created. Each tag is assigned to a specific object type, such as “contact”. Therefore, a contact tag cannot be converted into a domain tag or any other type.
Where can i manage my contact tags?
Path: Left sidebar → Settings → Tags
Direct URL: /settings/tags
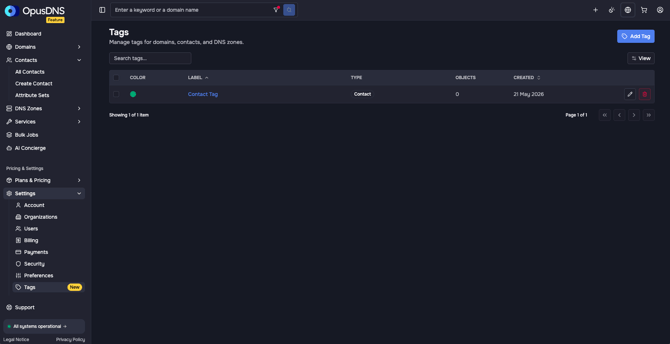
If you navigate to this settings page for the first time, the tags table will be empty.
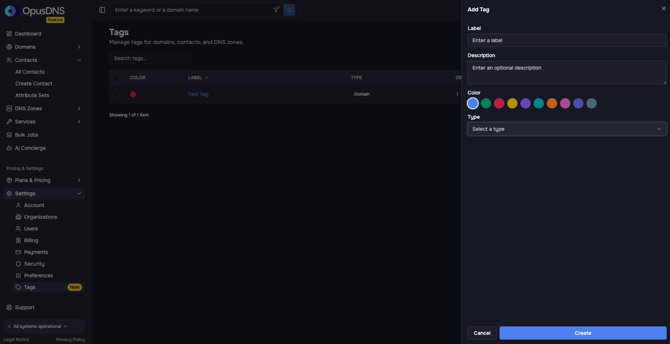
How to create contact tags?
Follow these steps:
- Navigate to Settings in the left sidebar and select Tags.
- Click “Add Tag” in the top-right corner.
- A menu will open:
- Enter a label for your tag (choose a descriptive name).
- Add a description for internal documentation and usage context.
- Select a suitable color for the tag.
- Set the type to “Contact”. If you choose a different type, the tag will not be available in the contacts context.
- Click “Create” to finish.
How to update contact tags?
Follow these steps:
- Navigate to Settings in the left sidebar and select Tags.
- Click on your tag you want to update.
-
A menu will open where you can update the following:
- The label of your tag
- The description of your tag
- The color of your tag
- Click “Save” to finish.
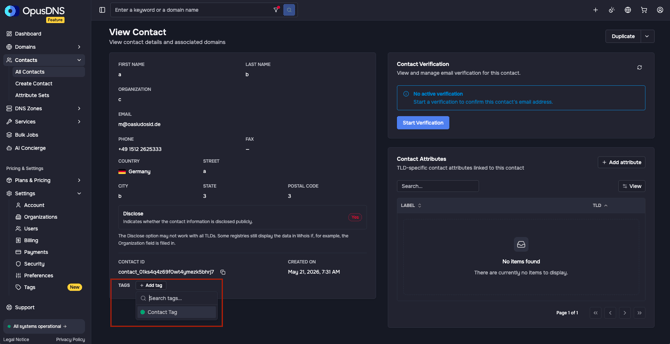
How to associate and remove contact tags?
Add a tag to a single contact
Path: Left sidebar → Contacts → All Contacts → Click on a contact
Direct URL: /contacts/[CONTACT_ID]
Follow these steps:
- Navigate to Contacts → All Contacts in the left sidebar and select a contact.
- In the contact profile, locate the Tags section and click “Add Tag”.
- Select a tag you have previously created (see sections above).
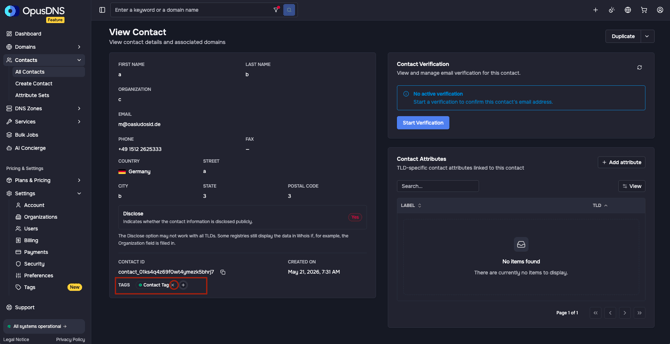
Remove a tag from a single contact
Path: Left sidebar → Contacts → All Contacts → Click on a contact
Direct URL: /contacts/[CONTACT_ID]
Follow these steps:
- Navigate to Contacts → All Contacts in the left sidebar and select a contact.
- In the contact profile, go to the Tags section.
- Click the “x” icon next to the tag you want to remove.
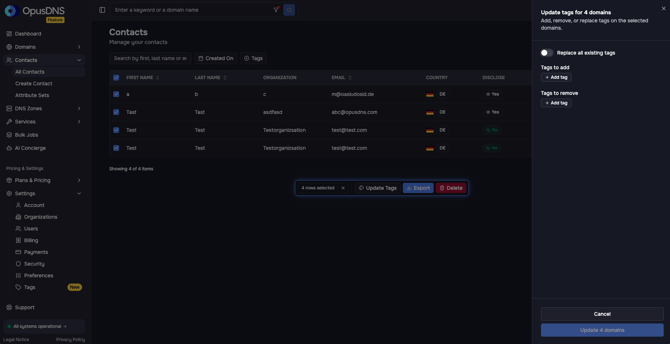
Add and remove tags for multiple contacts
Path: Left sidebar → Contacts → All Contacts
Direct URL: /contacts
Follow these steps:
- Navigate to Contacts → All Contacts in the left sidebar and select one or multiple contacts using the checkboxes at the beginning of each contact row in the table.
- Once at least one contact is selected, an action bar will appear.
- Click “Update Tags” in the action bar.
- A menu will open where you can:
- Select tags to add: Click “Add Tag” under “Tags to add”.
- Select tags to remove: Click “Add Tag” under “Tags to remove”.
- Optionally, enable “Replace all existing tags” to overwrite the current tag setup and apply new tags.
Please use this feature with caution, as replacing tags will overwrite existing assignments.
.jpg?width=670&height=174&name=Knowledge%20Base%20Banner_%205%20Dark%20(1).jpg)